本文环境搭建的基础是 Python3.9, 因为 M1 为 ARM 架构,所以放弃了
Anaconda,使用 Miniforge3。包括 Tensorflow, xgboost, Lightgbm, Numpy,
Pandas, Matplotlib, NGBoost 等。当然,因为是 Python3.9,
所以有些库实在是无法使用。
Homebrew
作为 Mac 的包管理神器,首先当然要先从 Homebrew 开始。Homebrew
已经支持了 ARM 架构,可以直接进行安装,当然,如果你电脑里以前存在 X86 的
brew 支持,请先卸载干净。
Homebrew 卸载
1 /bin/bash -c "$(curl -fsSL https://cdn.jsdelivr.net/gh/ineo6/homebrew-install/uninstall.sh) "
Install ARM Homebrew
1 /bin/bash -c "$(curl -fsSL https://cdn.jsdelivr.net/gh/ineo6/homebrew-install/install.sh) "
执行完毕后,Homebrew
安装在/opt/homebrew路径下;在安装完毕后,命令行后会提示执行命令设置环境变量,当然,以防万一,这里也提供一下:
1
2
echo 'eval "$(/opt/homebrew/bin/brew shellenv)"' >> ~/.zprofileeval "$(/opt/homebrew/bin/brew shellenv) "
如果是 bash shell, 则:
1
2
echo 'eval "$(/opt/homebrew/bin/brew shellenv)"' >> ~/.bash_profileeval "$(/opt/homebrew/bin/brew shellenv) "
记得source ~/.zprofile
Install X86 Homebrew
1 arch -x86_64 /bin/bash -c "$(curl -fsSL https://cdn.jsdelivr.net/gh/ineo6/homebrew-install/install.sh) "
X86 版本的安装执行完成后命令行未提示添加环境变量。
alias 支持多版本
在终端执行:
1
2
alias brew='arch -arm64 /opt/homebrew/bin/brew' alias ibrew='arch -x86_64 /usr/local/bin/brew'
这里可以看出两者路径区别
设置镜像
中科大源
1 2 3 4 5 6 7 8 9 10 11 "$(brew --repo) " remote set-url origin https://mirrors.ustc.edu.cn/brew.git"$(brew --repo homebrew/core) " remote set-url origin https://mirrors.ustc.edu.cn/homebrew-core.git"$(brew --repo homebrew/cask) " remote set-url origin https://mirrors.ustc.edu.cn/homebrew-cask.git
清华大学源
1 2 3 4 5 6 7 8 9 10 11 "$(brew --repo) " remote set-url origin https://mirrors.tuna.tsinghua.edu.cn/git/homebrew/brew.git"$(brew --repo homebrew/core) " remote set-url origin https://mirrors.tuna.tsinghua.edu.cn/git/homebrew/homebrew-core.git"$(brew --repo homebrew/cask) " remote set-url origin https://mirrors.tuna.tsinghua.edu.cn/git/homebrew/homebrew-cask.git
恢复默认源
1 2 3 4 5 6 7 8 9 10 11 "$(brew --repo) " remote set-url origin https://github.com/Homebrew/brew.git"$(brew --repo homebrew/core) " remote set-url origin https://github.com/Homebrew/homebrew-core.git"$(brew --repo homebrew/cask) " remote set-url origin https://github.com/Homebrew/homebrew-cask.git
更多源
Homebrew 其他相关
设置 bottles 镜像
1 2 3 4 5 6 7 echo 'export HOMEBREW_BOTTLE_DOMAIN=https://mirrors.ustc.edu.cn/homebrew-bottles/bottles' >> ~/.zprofilesource ~/.zprofileecho 'export HOMEBREW_BOTTLE_DOMAIN=https://mirrors.ustc.edu.cn/homebrew-bottles/bottles' >> ~/.bash_profilesource ~/.bash_profile
cask
目前 cask 是从 GitHub 上读取软件源,而 GitHub Api
对访问有限制,如果使用比较频繁的话,可以申请 Api
Token,然后在环境变量中配置到HOMEBREW_GITHUB_API_TOKEN。
1
2
echo 'export HOMEBREW_GITHUB_API_TOKEN=yourtoken' >> ~/.zprofilesource ~/.zprofile
Install Miniforge3
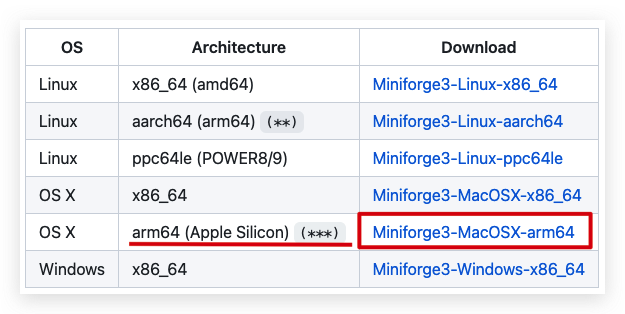
首先需要下载安装包: Download
请下载 arm64(Apple Silicon)版本:
下载完成后进入到文件目录,比如我是在~/Download/内,执行:
1 bash Miniforge3-MacOSX-arm64.sh
整个执行过程会有大概三次填写yes并回车确定,最后一次会询问你是否执行conda init,
会自动在~/.zshrc内添加环境变量,如果未执行的,可以将下面语句加入文件末尾:
1 2 3 4 5 6 7 8 9 10 11 12 13 14 15 16 "$('/Users/xx/miniforge3/bin/conda' 'shell.zsh' 'hook' 2> /dev/null) " if [ $? -eq 0 ]; then eval "$__conda_setup " else if [ -f "/Users/xx/miniforge3/etc/profile.d/conda.sh" ]; then "/Users/xx/miniforge3/etc/profile.d/conda.sh" else export PATH="/Users/xx/miniforge3/bin:$PATH " fi fi unset __conda_setup
记得自行更改/Users/xx/内的用户名
等待 Miniforge3 安装完成,然后设置一个专供学习 Tensorflow
的虚拟环境
1
2
conda create -n tf python=3.9.5
关于 conda 切换环境的命令,建议自行 Google 学习一下,很有用。
Install Tensorflow
目前网上流传的 Tensorflow
安装基本是两个版本,一个是安装一大堆的支持和依赖,一个是使用yml文件提前准备好环境库一键完成环境创建,比如environment.yml:
1 conda env create --file=environment.yml --name=tf
其实这一步也很简单,Apple 为了大力推广自家的
ARM,已经为大家做好了这部分准备,我们只需要安装就行了。
假设目前在tf环境内
1
2
3
conda install -c apple tensorflow-deps
好了,结束!
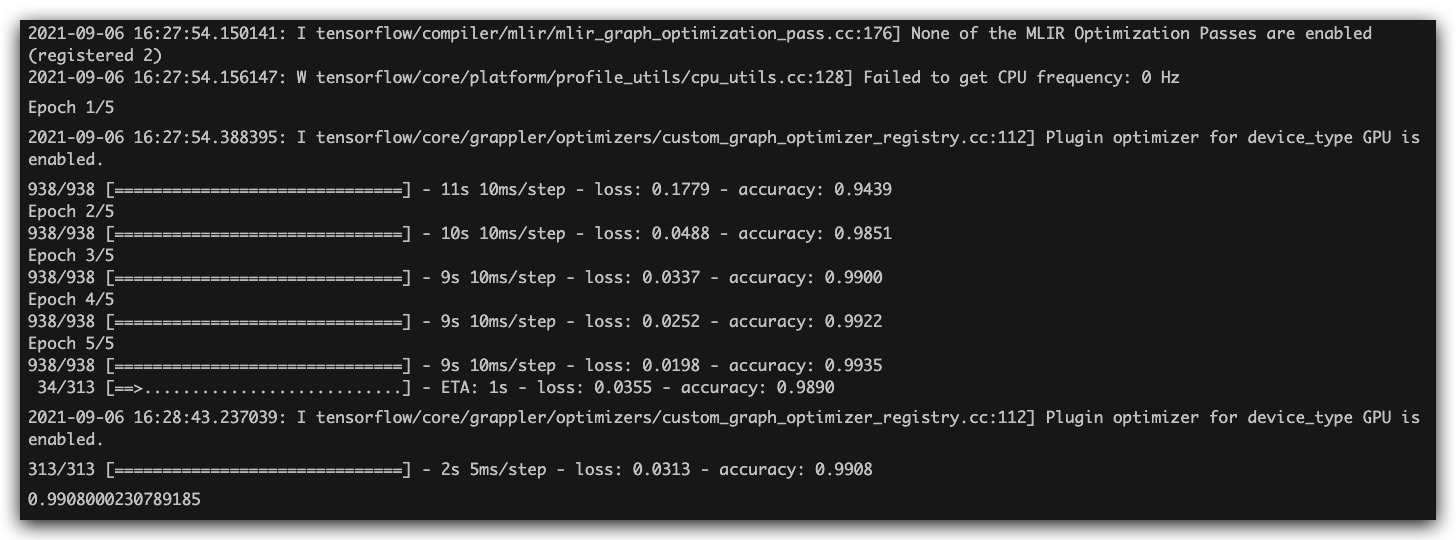
可以自行利用下面一段代码测试下:
1
2
3
4
5
6
7
8
9
10
11
12
from tensorflow.keras import layersfrom tensorflow.keras import models32 , (3 , 3 ), activation='relu' , input_shape=(28 , 28 , 1 )))2 , 2 )))64 , (3 , 3 ), activation='relu' ))2 , 2 )))64 , (3 , 3 ), activation='relu' ))64 , activation='relu' ))10 , activation='softmax' ))
1
2
3
4
5
6
7
8
9
10
11
12
13
14
15
from tensorflow.keras.datasets import mnistfrom tensorflow.keras.utils import to_categorical60000 , 28 , 28 , 1 ))'float32' ) / 255 10000 , 28 , 28 , 1 ))'float32' ) / 255 compile (optimizer='rmsprop' ,'categorical_crossentropy' ,'accuracy' ])5 , batch_size=64 )
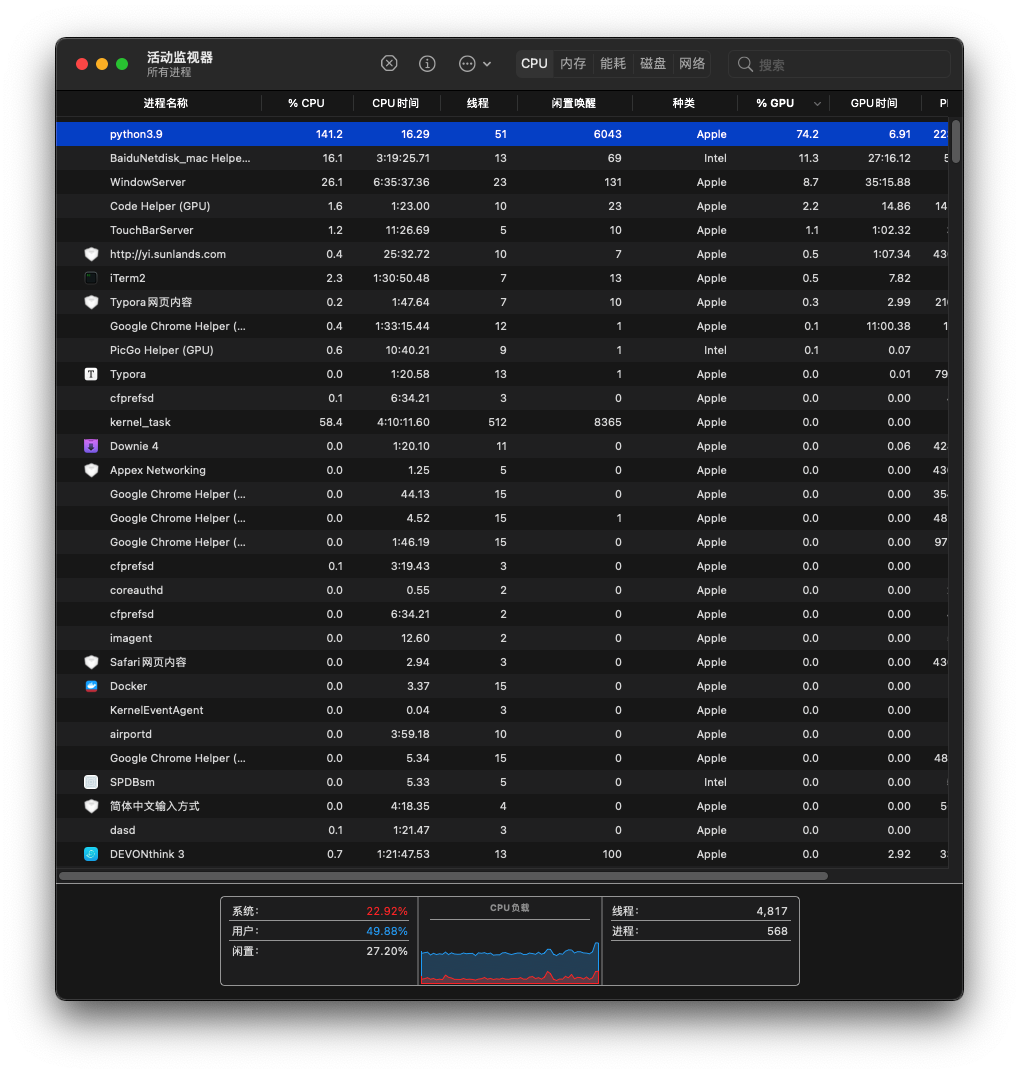
执行过程中可以在资源管理器中看到 GPU 的占用:
其他
Lightgbm
一句代码解决,完全靠谱。
xgboost
xgboost
稍微有点麻烦,我测试了最稳妥的安装方式,还是自行编译,那这个时候我们就需要用到brew安装并设置编译环境了:
注意,我用的都是brew而非ibrew, 目前都是在
ARM 环境下完成操作。
1
2
3
brew install gcc
然后下载源码并执行
1
2
3
4
5
6
7
git clone git@github.com:dmlc/xgboost.gitcd xgboostmkdir buildcd buildcd ../python-package
然后就 OK 了。
至于其他的,Numpy 在安装 Tensorflow
的时候就自动作为依赖安装了,Pandas, Matplotlib, NGBoost
等,执行下方:
1
2
3
conda install -c conda-forge pandas
如果 conda 内实在没有的,再试试 pip
安装,再不行,就只能自行下载源码编译了。
目前在当前环境下解决不了的几个库:
CatBoost Cairo -> Pycairo GraphEmbedding CV2 igraph
在整个过程中,可能会遇到各种各样的问题,大家要习惯于使用 Google
和查阅官方文档;
参考
Tensoflow-macos
Run
xgboost on Mac and Regression data
Accelerating
TensorFlow Performance on Mac
The
new Apple M1 chips have accelerated TensorFlow support
M1
Mac Mini Scores Higher Than My RTX 2080Ti in TensorFlow Speed
Test.
GPU
acceleration for Apple's M1 chip?
M1 芯片 Mac 上
Homebrew 安装教程
Mac mini M1
使用简单体验(编程、游戏、深度学习)
Installing
TensorFlow 2.4 on MacOS 11.0 without CUDA for both Intel and M1 based
Macs
在 M1 芯片 Mac 上使用
Homebrew
Apple M1 终于让
MacBook 变的可以炼丹了
Install
XGBoost and LightGBM on Apple M1 Macs
Installing
TensorFlow on the M1 Mac
Getting
Started with tensorflow-metal PluggableDevice
M1
芯片 mac 安装 xgboost 和 lightgbm
AI -
Apple Silicon Mac M1 机器学习环境 (TensorFlow, JupyterLab,
VSCode)
M1
芯片安装 tensorflow
使用 MacBook pro M1
搭建基于 ML Compute 加速的 TensorFlow 深度学习环境
你的 Mac
有了专用版 TensorFlow,GPU 可用于训练,速度最高提升 7 倍
在
M1 的 Mac 上安装 Tensorflow(避坑版)
在 M1 芯片 Mac
上搭建原生适配 Python 环境
Conda-forge
Miniforge
M1 mac 安装 PyTorch
的完整步骤指南
macOS
M1(AppleSilicon) 安装 TensorFlow 环境
傻瓜版 M1 配置
Tensorflow-超简单近乎一键完成
environment.yml
opencv-python
MAC 安装 Opencv 以及
Dlib 碰到的一些问题
Jupiter
Widgets
启动
SparkContext 报错
MacBook Pro 2020 M1
芯片安装 xgboost
xgboost
Homebrew /
Linuxbrew 镜像使用帮助
镜像助手
Apple Silicon Mac
安装 xgboost
M1
芯片 mac 安装 xgboost 和 lightgbm
mac
安装 lightgbm 踩坑心得,亲测有效!
MAC 上 使用
lightgbm 遇到 image not found 解决办法总结
杂记-Macbook
Pro M1 芯片能玩深度学习吗?